|
|
“ EVERY
TREE DESERVES DEADWOOD” (Dan Robinson)
|
Jin, Shari or Uro
So what do these fancy sounding japanese names mean. Basically they are used
as a convenient shorthand description for the various forms of deadwood.
Jin - describes a dead branch or branch stub where the bark has also been stripped.
|
|
In our pursuit of the wonderful hobby/pastime/art of
bonsai there are many techniques used to varying effect in the design of our trees. While not everyone agrees with Mr Robinson,
deadwood can often be incorporated into a design and may even be the focal point of the design for many trees. On the other
hand many designs especially in deciduous species do not need the addition of deadwood. As with any other technique, deadwood
is just one of the tools the artist has at hand to create his bonsai art. Lets look at the different uses of deadwood in nature
and in our bonsai designs.
|
Shari - describes a
dead area of the trees trunk which again has had the bark peeled.
Uro - are hollowed
out areas and are mainly used on yew, pine and deciduous material. Of course some trees will have none of these, some will
have one or two and some will have all three - as long as it works visually.
|
|
|
DEADWOOD IN DECIDUOUS TREES
Oh
no what would the purists say, “deadwood doesn’t
belong on deciduous trees”. Of course these are the same people who tell you to design your trees with left branch-right
branch-back branch and expound on the virtues of the triangle. I think much of the resistance to deadwood on deciduous trees
is based on the Japanese aesthetic where deciduous trees in nature rarely have deadwood and the problem of rot.
|
|
|
|
|
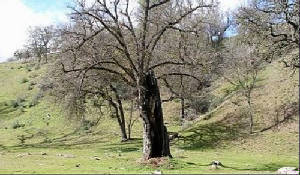
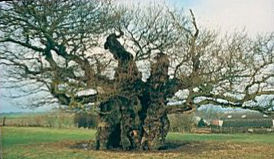
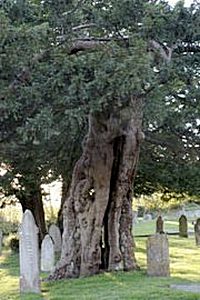
| Top: The Birnam Oak |
The majority
of deciduous bonsai material are quickly grown to attain large trunks, because of this some large chops occasionally have
to be made. In some species these large chops heal very slowly and may never fully heal over. Carving can be used to disguise
these chops as hollows and incorporate them into the design to create truly ancient looking bonsai.
But how do we deal with the rotting of deciduous wood
over time. In some cases we actually may want to encourage some rot to create a more natural look, however at some point in
time you will want to preserve the state of the wood.
|
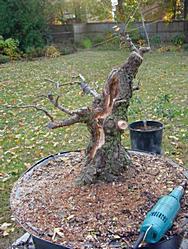
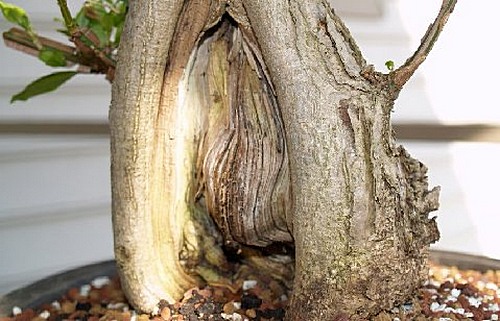
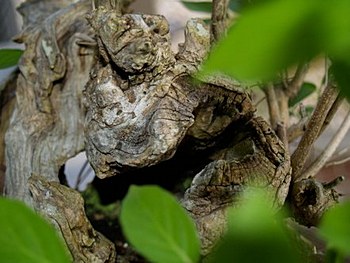
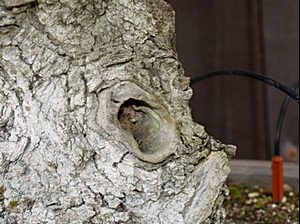
| Bottom: Cork bark chinese elm with carved hollow/shari |
Obviously as
we are trying to imitate the look of rotted hardwood, the bright white color of lime sulfured deadwood will look glaringly
out of place. However if the wood is burned and charred using a gas torch then the charred wood is brushed with a brass or
steel brush to remove the charcoal, this will harden the wood against further rot and provide some pleasing shadows within
any hollowed out areas. As a further precaution the wood can then be treated with a couple of coats of teak oil.
Teak oil is a
natural wood preservative which should penetrate the wood without leaving the shiny film
some other coatings leave.
|
| Photo courtesy woodland-trust.co.uk |
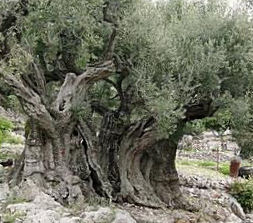
Take a look at the trees on this page, these
are truly ancient oak and olive trees. Notice how the deadwood is part of the overall image and seems almost to have been
designed to enhance the feeling of age and stature these trees have. Now not many bonsai trees can pull this off convincingly
but we can take inspiration from these trees and incorporate some of these features.
|
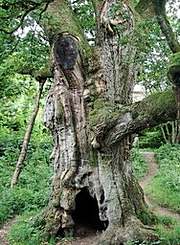
| Photo courtesy woodland-trust.co.uk |
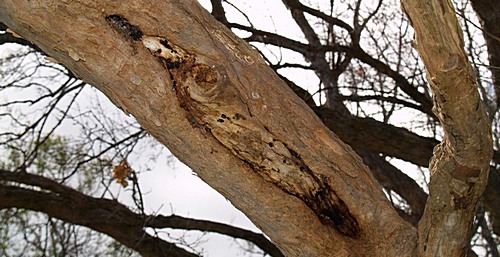
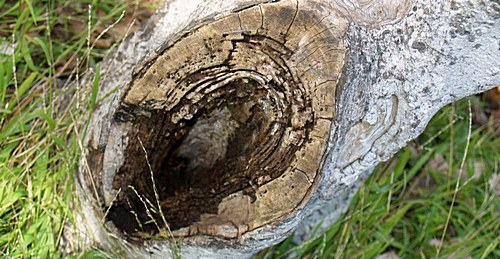
Removal of a branch can either be treated so
that it heals over or we can take the opportunity to create a small hollow to add a bit of character. Large cuts or trunk
chops can be turned into an deep shari with further hollows and rotted areas. Obviously this can be overdone and the artist
must be careful not to overwhelm the image with too much deadwood in the design.
|
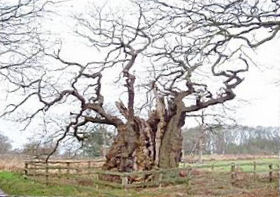
| Photo courtesy woodland-trust.co.uk |
The tree design should also reflect that of
an old tree as the combination of aged deadwood with a young vigorous tree image will be jarring. These techniques are best
suited to trees with a lot of character, for example a gnarled or twisted trunk, and undulating branches. Think of the Disney
halloween trees.
Right, now lets get down to the nitty gritty,
how do we create realistic and natural looking deadwood in deciduous trees? The first step is to study natural deadwood up close to understand the forms and textures deadwood takes in various species
and locations.
Note how the wood flows around the hollows from a branch,
compare this with the structure around the hollows in the trunk. Study how the grain flows and how the cracks align with the
grain, if any jin are present they are usually stumps with the center rotted away.
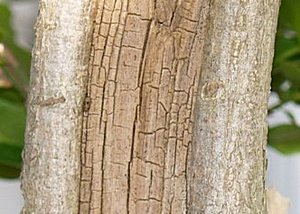
CARVING DECIDUOUS WOOD
Rough carving is performed using
power tools to remove bulk wood and create large hollows, ensure you don’t carve across the grain. Any naturally occurring
flaws can be exploited to create character, remember to follow the grain.
As you move to the detail work move to the smaller
bits with the dremel tool, the thin cutting bits can be used to create layers within the hollows to create texture. Try to
make sure there is nowhere for water to pool. The torch can be used to burn o ff
stray fibers from the carving.

|
|
| Top: Intense burning of carved wood |
|
| Bottom: Light burning |
|
Once the carving is complete, cover the branches
and then use the torch again to scorch the deadwood. The deadwood can be burned in di fferent degrees to give different effect. Slight burning can enhance the texture by creating shadows. Intense burning
can create natural looking splits and cracks in the wood and is good for removing tool marks, it also chars the wood and this
should then be brushed with a wire brush.
Before applying any protectant or preservative to
the deadwood let it age a few months this allows rainwater to wash off any remaining charcoal. Once aged the deadwood can
be treated with teak oil to prevent further rot.
|
|
The Color of Love
The white or silver bleaching that comes from using lime-sulfur
as a preservative looks a little unnatural on the deadwood of lowland deciduous trees.
A more natural appearance can be obtained by either of 2 methods:
1. Adding a drop of brown watercolor paint to the lime sulfur.
2. Burning the wood with a gas torch, brushing clean and then treating
with teak oil. In fact 1 and 2 can be combined.
I really recommend burning to harden the wood and protect against
rot
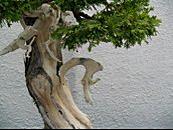
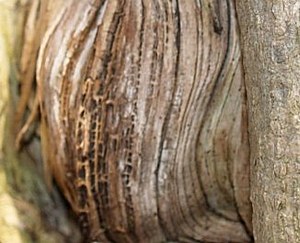
EXAMPLES OF DIFFERENT CARVING EFFECTS
|
|
| Jin with hollows |
|
|
| Shari with hollow to disguise |
|
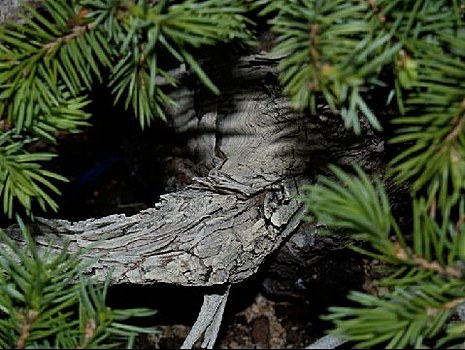
DEADWOOD IN CONIFEROUS TREES
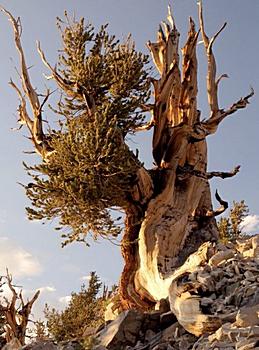
|
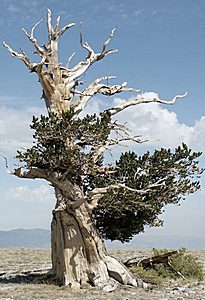
| Bristlecone Pine (photo courtesy Mike Randall) |
Deadwood in coniferous trees is a much more
familiar subject and it is widely used in both the East and West. In general we are trying to emulate the wind blown, scoured
deadwood seen on high mountain trees. Many collected mountain trees have wonderful natural deadwood however they can pose
a more di fficult challenge to the artist to style. In general
these trees are very old and do not conform to the generic style guidelines. In addition, when further branch removal is necessary
it can be difficult to disguise the removal site with a jin or shari, as the fresh deadwood looks out of place beside the
aged and textured natural deadwood.
The majority of bonsai practitioners do not have access
to these very old collected trees but would still like to emulate the aged look of these mountain trees with more accessible
garden and nursery material. Using a variety of tools and techniques it is possible to create very credible deadwood to match
the aged look we are interested in.
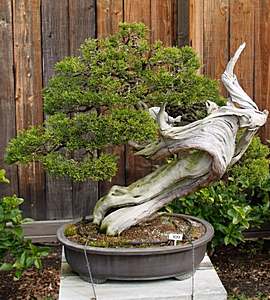
|
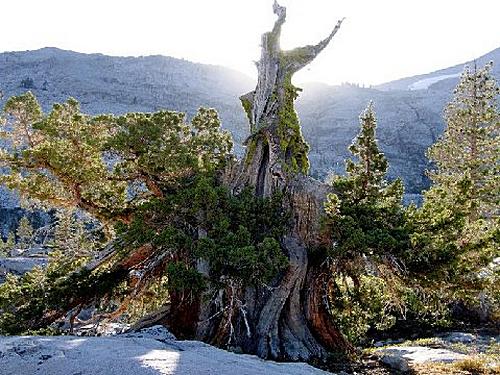
| California Juniper in GSBF Collection North |
Each tree species has certain deadwood properties
which should be taken into account when planning any carving work. In addition some techniques are more suited to one species
over another. Yews (Taxus) for example, are not as easy to carve using the thread carving techniques as the fibers tend to break easier
than junipers. Another consideration is whether you are carving fresh deadwood or old aged wood. If the wood is fresh some
great texture can be obtained using the thread carving techniques. Unfortunately once the wood has dried out, thread carving
cannot be used as the fibers will break without too much effort. In this case hand carving with chisels/gravers can be used,
power tools with various bits are also used to good effect.
Deadwood by Species
Some trees are suited to certain deadwood characteristics.
Juniper: Resinous wood withstands weathering,
delicate jins and large shari are common, hollows are uncommon.
Yew: More likely to show weathering,
jins are blunt and short, shari likely to have hollows.
Pine: Resinous wood, can have delicate
jin, large shari are less common, hollows are uncommon.
Again for inspiration we need to look at coniferous trees in nature. The trees on this page are ancient
yew, pine and juniper from the lowlands and mountains. Notice how the yew has natural hollows within the trunk that seem to
be designed to enhance the feeling of age and stature these trees have. The wind scoured pine struggling to survive with jagged
jin and smooth twisted shari. The majestic juniper with its impressive furrowed and weathered shari and jin and deep red life
lines.
|
|
|
With
conifers, the removed branches or trunk chops are very slow to heal over, in fact junipers tend to withdraw from a wound unless
growing very vigorously. This explains the layered look on juniper deadwood where the live bark recedes slowly over the years.
In this case these chop sites or branch cuts need to be disguised as either shari or jin.
Or we may just want to create one of the wild
looking deadwood creations made so popular by Masahiko Kimura. In either case our first step should be to look to nature for
guidance and to study how the deadwood flows twisting and turning.
|
| Juniper (photo courtesy Stephen Hayden) www.sphaydenphotography.com |
Again we need to study
and mimic both the overall look and feel of trees in nature and the close up details of their deadwood. Notice how the juniper
wood is peeled back in layers in line with the grain of the wood, this effect is best achieved using the thread carving method.

|
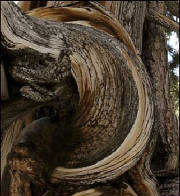
| Yew Deadwood |
|
|
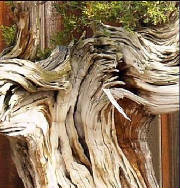
| Pine Deadwood (photo courtesy Mike Randall) |
|
|
| Juniper Deadwood |
|
The swirls and cracks seen
in the aged wood of the yew can be created by a combination of thread carving (where possible), machine carving and use of
knives, these effects can be enhanced by severe burning with the torch after carving. The pine deadwood sometimes has the
peeled look of the juniper but with areas of crackled deadwood, this is the most difficult to mimic, though a convincing image
can be produced with knives and the torch.
CARVING CONIFERS
Here the approach will vary depending on the species,
type of deadwood feature and age of the deadwood to be worked. The first step though is to formulate a
plan of the envisioned outcome. Under no circumstance should the carving begin without the artist having a picture (at least
in his mind) of the final outcome. This of course can be changed once things get started and other features present themselves
but it cannot be stressed enough.
Thread Carving:
Used on fresh wood (<6 months dead) to make jin and small
shari. Recently Cheng Cheng Kung has demonstrated a technique (Si Diao) for making extensive shari using thread carving techniques.
This works very well on resinous woods (juniper, pine) but is limited on yew (wood needs to be very fresh). Below its use
for creating a jin is detailed but the same techniques can be used on the trunk to make shari.
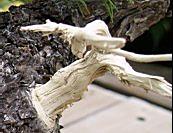
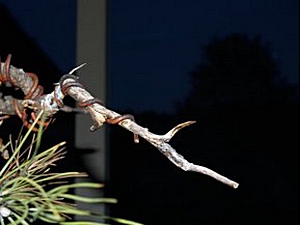
Jin making:
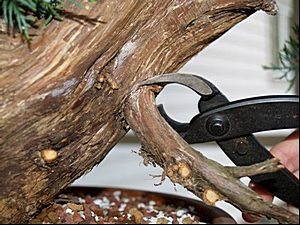
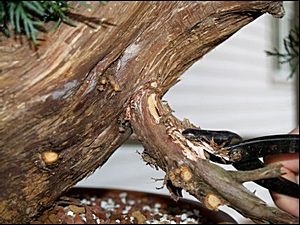
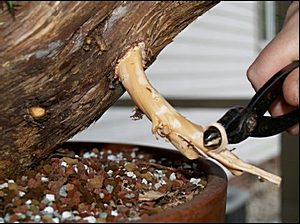
First select the branch for jinning and score the bark at
the desired end point. Then remove the bark by crushing with pliers then peeling. Make some cuts in the end of the jin, then
with the pliers grab some of the wood fibers and peel back towards the trunk. Rotate the pliers wrapping the fibers around
the head as this provided more leverage. Sometimes the fibers will want to run onto the trunk and create a small shari, if
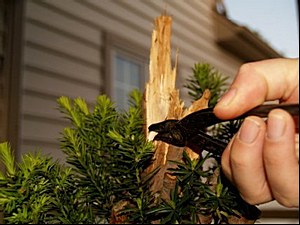
this is not desired start cutting fibers an inch or so from the desired end point so that the jin gradually thickens. Any
loose ends can be burnt away later.
Repeat this all around the jin, varying the number of fibers pulled
to give a more natural appearance. Individual fibers can be lifted with chisels or gravers to add more character.
|
|
| Scoring the bark at the branch collar |
|
|
| Removing the bark |
|
|
|
| Peeling the fibers |
|

|
| Jin is burnt to remove excess fibers |
|
Carving Shari
Thread carving can be used but is very time consuming on large material. For a large amount of wood removal,
or when carving dry aged wood, power tool carving is advised.
Power Tool Carving
Carving should follow the grain of the wood,
small details in the grain sometimes become exposed during carving, these should be enhanced and become a feature of the shari.
Do not carve across the grain as when the wood dries and ages, as it naturally does, small cracks appear in line with the
grain and any carving across the grain then tends to look fake.
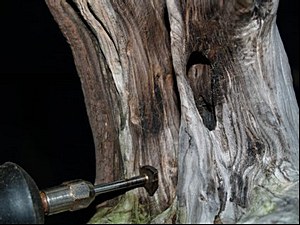
Bulk wood removal is best accomplished using
the aggressive ¼ inch bits or even chainsaws. Always follow the manufacturer’s safety guidelines when working with power
tools. In addition a foot pedal control is also recommended; also ensure that the piece being worked on is firmly held. Rough
carving to establish the structure of the deadwood is performed at this stage.
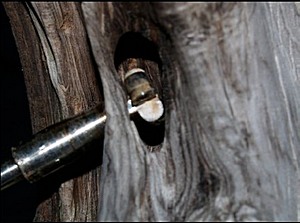
Hollows can be created using a number of specialized
bit such as the Samurai Shogun and the Kaizen Weasel. Although you will need to create an entry into the hollow for the tool,
try to make sure the entry is not too regular, then create details around the edges. In fact none of the work should look
too regular as this looks man-made, the work isn’t finished until you can’t tell it was worked on. On yew hollows
can be created within jins.
In general after the heavy carving is completed it
is time to use the smaller 1/8 inch type tools to create layers in the wood and add detail to the work. Enhance the features
that were found during the initial bulk carving and try to blend in any tool marks as much as possible
|
|
| Shari thread carving |
|
| Creating hollows |
|

|
| Bulk wood removed |
|
| Detail carving |
|
| |
|
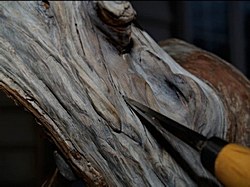
Special E ffects
Fine cracks can be introduced into the deadwood
to create a more natural e ffect. Using a very sharp knife
score a line a couple of millimeters deep along the line of the wood grain. Don’t repeat this too regularly, the lines
should not be the same length or next to each other, try to vary their position randomly. These gaps will widen over time
and with exposure to the elements. This can be accelerated somewhat by burning with the torch.
The crackling effect seen on old pine deadwood can
also be reproduced somewhat. Again a sharp knife is used but this time many small scallops are cut into the wood and lifted
slightly. This is then burned lightly with the torch then left to age.
Another way to obtain a crackled effect is simply
to burn the wood very deeply, then apply a light brushing to remove the charcoal.
Before applying any protectant or preservative to
the deadwood let it age a few months, this allows rainwater to wash off any remaining charcoal.
|
| Introducing fine cracks |
Once aged the deadwood can be treated with lime
sulphur to prevent further rot. Generally the remaining charcoal will leave the shari a dark grey after lime sulphur application.
A few applications a couple of weeks apart will get the color to a more natural light grey. If the color is too white a drop
of india ink can be added to the lime sulphur.
EXAMPLES OF DIFFERENT CARVING EFFECTS
|
| Small jin with hollows |
|
|
| Hollows within shari |
|
|
| Shari used to disguise trunk chop site |
|
Occasionally the jins we created don’t fit in with
the design and would look better with a change of direction or with more movement to match a very dynamic tree. Their are
a couple of carpenter tricks which can be used to bend the wood in a different direction as long as the jin isn’t too
thick.
Jin up to a 1/2 inch thick can be bent with the direct
application of the torch to the area where the bend is needed. This can take some time and cause a deep burn (if this isn’t
desired try the other method). It also helps to twist the jin (in the direction of the grain) as you are bending it. Finally
the branch should be wired into place to prevent any spring back due to memory in the wood.

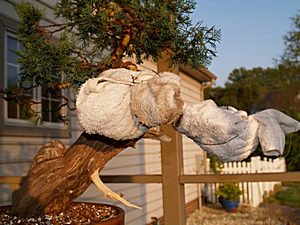
Another way to bend jin is to wrap hot wet towels around
the wood in the area of the bend. After around 10 minutes (replace towels as they cool) the jin can be bent and secured as
before.
Fire It Up
When using the torch for burning there are several precautions
to take prior to applying any heat to the tree.
Make sure to protect the live portions of the tree, when burning
jin/shari on the lower portions of the tree a large amount of heat rises from the work area and can damage unprotected areas.
Branches should be wrapped with wet towels to prevent damage.
When burning closer to the live wood edges adjacent to the deadwood
these edges should be protected using a layer of plasticine or modeling clay which can be easily peeled off when burning is
complete.
|
|
|
DEADWOOD & CARVING
Hopefully this gives some insight into creating
natural looking deadwood but of course it isn ’t exhaustive and really there is no substitute for aged natural deadwood.
The following pages show some good examples of both deciduous and coniferous bonsai with deadwood and some close up details
of the deadwood. Remember the best way to create natural deadwood is to study it in nature, even take photographs and use
them as a guide.
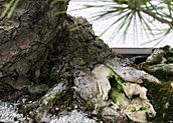
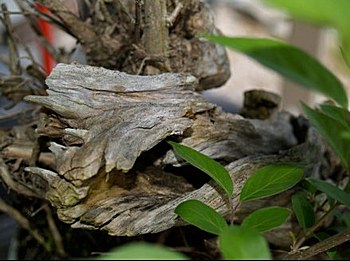
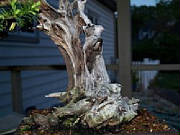
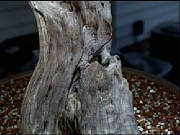
EXAMPLES OF DEADWOOD BONSAI
|
|
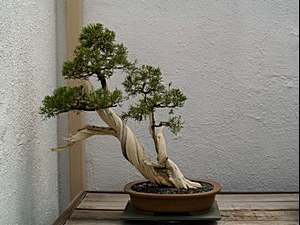
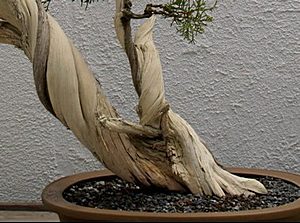
| Juniper with Shari |
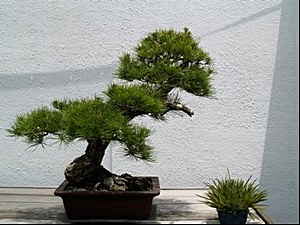
|
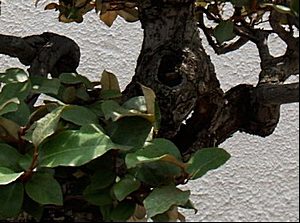
| Pine with hollow |
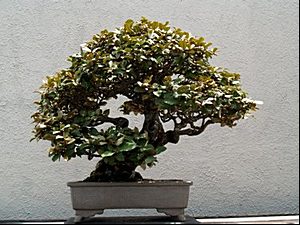
|
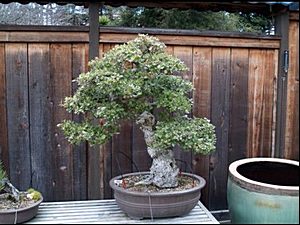
| Euonymus |
|
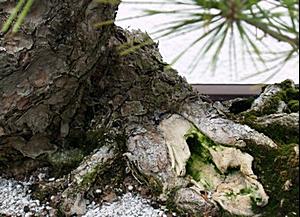
| Coast Live Oak |
|
|
| Shari detail |
|
| Hollow detail |
|
| Euonymus deadwood detail |
|
| Oak hollow detail |
|
| |
|
| |
|
| |
|

|
| Return to Bonsai Vault |
|